
AI Job Walkthroughs
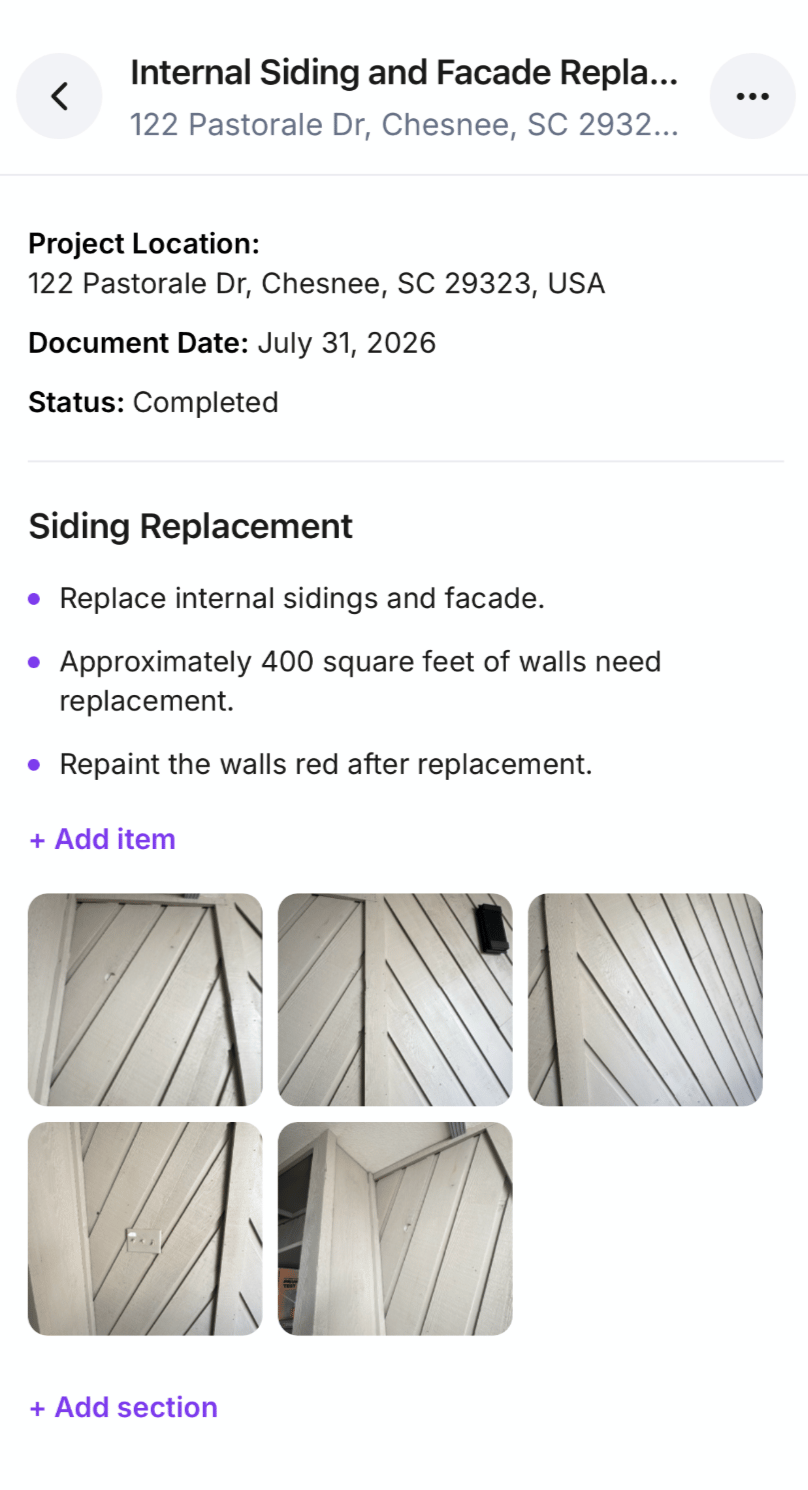
AI Job Walkthroughs let field teams document a jobsite by recording a guided walkthrough while speaking naturally about the work. As the user moves through the property, Feldy captures audio and visual context. The walkthrough is then processed into a structured project document with organized work items, supporting photos, and written descriptions. Instead of returning to the office to organize notes manually, field teams can walk the site, explain what needs to be done, and let Feldy turn the visit into usable documentation.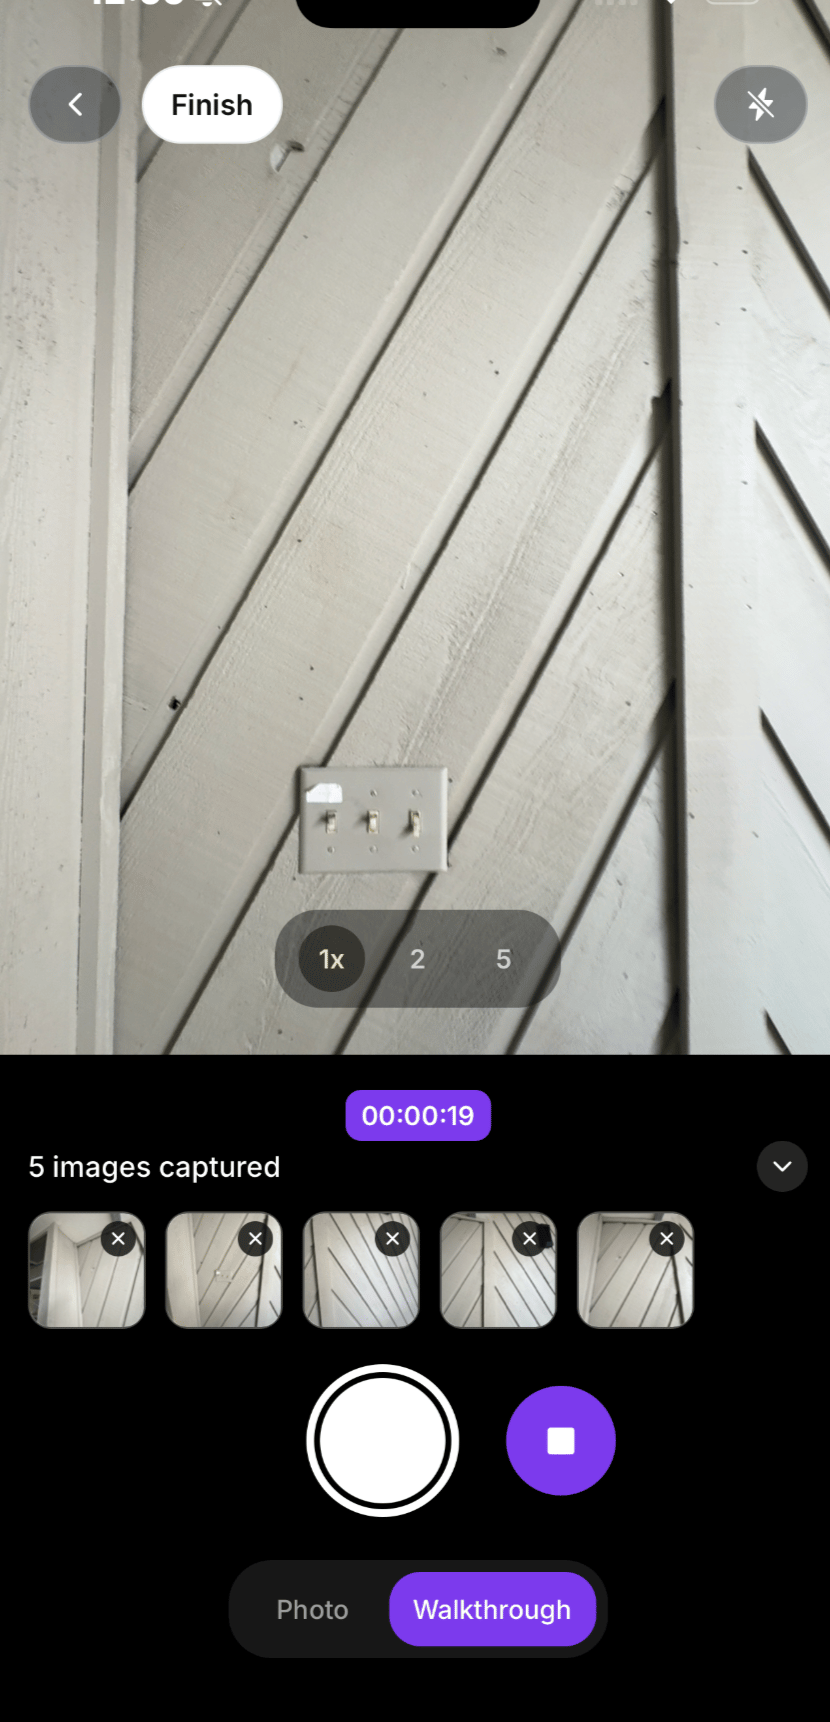
What an AI Job Walkthrough captures
A walkthrough can capture:- Spoken observations
- Photos captured during the walkthrough
- Visual jobsite context
- Areas requiring work
- Customer requests
- Existing conditions
- Damage or defects
- Proposed repairs
- Replacement items
- Installation requirements
- Project notes
- Separate work categories
- Supporting images for each work item
Start an AI Job Walkthrough
There are several ways to begin a walkthrough.From a project camera button
Camera buttons appear in several places throughout the Feldy app, including project and deal views. To start from a project:- Find the project you want to document.
- Select the camera button.
- Open the capture screen.
- Select Walkthrough at the bottom of the screen.
- Begin recording.
From the global create menu
You can also start a walkthrough from the main create menu:- Select the purple plus button.
- Choose AI Job Walkthrough.
- Select the project where the walkthrough should be saved.
- Begin recording.
From the capture screen
When the Feldy camera is already open:- Find the capture-mode control at the bottom of the screen.
- Switch from Photo to Walkthrough.
- Select the record control to begin.
Record the walkthrough
During the walkthrough, move through the jobsite and explain what you see. Speak as though you were describing the project to an estimator, project manager, or installer. For example:Replace the two windows in this room. The existing frames are damaged, and the customer wants white replacement windows.Or:
Repaint this wall. There is cracking near the upper corner, so include surface preparation and patching before paint.You can describe multiple areas and types of work in one walkthrough. Feldy can separate the recording into sections such as:
- Window replacement
- Wall painting
- Flooring
- Cabinet work
- Drywall repair
- Exterior repairs
- Cleanup
- Customer requests
Capture photos during the walkthrough
Photos can be captured while the walkthrough is recording. Use the photo control to document:- The exact area being discussed
- Damage
- Material conditions
- Windows and doors
- Flooring
- Walls and ceilings
- Fixtures
- Product labels
- Access restrictions
- Areas requiring repair
- Customer-requested changes
Finish the walkthrough
When you have finished documenting the jobsite:- Select the stop control.
- Select Finish.
- Wait while Feldy uploads the photos and audio.
- Keep the app open until the upload is complete when possible.
Processing the walkthrough
After upload, Feldy analyzes the audio and captured images. The processing workflow may include:- Transcribing the spoken recording
- Identifying work categories
- Organizing related observations
- Connecting photos to work items
- Creating section headings
- Summarizing requested work
- Building a structured document
- Suggesting a document title
Find a completed walkthrough
Completed walkthroughs are stored under the project’s Docs section. Each AI-generated walkthrough document includes an AI Walkthrough label so users can distinguish it from other project documents. The document card can display:- Document title
- Project address
- Creation date and time
- AI Walkthrough label
- Share action
- Delete action
Review the generated document
A completed walkthrough document can include:- Project location
- Document date
- Processing status
- Organized work categories
- Written scope items
- Supporting photos
- Additional notes
- Multiple areas of work
Window Replacement
- Replace two windows.
- Inspect the surrounding trim.
- Confirm final product dimensions before ordering.
Wall Painting
- Prepare and repaint the wall.
- Repair visible surface defects before painting.
- Protect nearby windows, floors, and furniture.
Edit a walkthrough document
AI Walkthrough documents can be edited after processing. Users can:- Rename the document
- Edit section titles
- Edit generated descriptions
- Add work items
- Remove incorrect items
- Add notes
- Add or remove photos
- Reorganize content
- Correct AI-generated details
Add an item
Each section can include an Add item action. Use it to add information that was not captured or recognized during the original walkthrough. Examples include:- Additional repair work
- Customer selections
- Material requirements
- Exclusions
- Access notes
- Follow-up inspection items
- Installer instructions
Rename a walkthrough
To rename the document:- Open the walkthrough.
- Select the three-dot menu.
- Choose Rename.
- Enter the new title.
- Save the change.
- Window Replacement and Interior Painting
- Kitchen Remodel Walkthrough
- Water Damage Inspection
- Rental Turn Scope
- Exterior Repair Walkthrough
- Main Floor Flooring Replacement
Share a walkthrough
Walkthrough documents can be shared with customers, office staff, subcontractors, or other project participants. To share:- Open the walkthrough document.
- Select Share.
- Choose the available sharing method.
- Review the document before sending it.
- Existing conditions
- Requested work
- Project scope
- Damage
- Customer decisions
- Field observations
- Photos from the visit
Delete a walkthrough
To delete a walkthrough:- Open the document.
- Select the three-dot menu.
- Choose Delete.
- Confirm the deletion.
Use walkthroughs for estimating
AI Job Walkthroughs can provide context when building an estimate. A walkthrough may help identify:- Work categories
- Required labor
- Material needs
- Demolition
- Disposal
- Repairs
- Installation
- Preparation work
- Access requirements
- Customer requests
- Potential exclusions
- Window removal
- Replacement windows
- Installation labor
- Interior trim
- Exterior trim
- Flashing
- Sealant
- Disposal
- Painting and touch-up
Use walkthroughs in project documents
The structured content can also support:- Scope-of-work documents
- Field reports
- Inspection reports
- Customer updates
- Proposals
- Change orders
- Restoration reports
- Internal work plans
- Installer instructions
- Project handoffs
Best use cases
AI Job Walkthroughs are useful whenever a field user needs to document multiple observations quickly without stopping to type detailed notes.Remodeling
Common uses include:- Kitchen remodels
- Bathroom remodels
- Basement finishing
- Whole-home renovations
- Garage conversions
- Room additions
- Interior reconfiguration
- Existing-condition documentation
- Preconstruction visits
- Customer-request capture
Roofing and exteriors
Walkthroughs can document:- Roof damage
- Siding replacement
- Window replacement
- Door replacement
- Gutter work
- Fascia and soffit repairs
- Exterior painting
- Trim replacement
- Deck and railing work
- Storm damage
Painting
Painting contractors can capture:- Rooms included in the scope
- Walls and ceilings to paint
- Existing colors
- Surface damage
- Cracking or peeling
- Trim requirements
- Accent walls
- Customer color requests
- Preparation requirements
- Areas requiring protection
Flooring
Flooring teams can document:- Existing flooring materials
- Rooms included
- Transitions
- Subfloor damage
- Stairs
- Removal requirements
- Furniture conditions
- Customer material selections
- Floor preparation
- Disposal needs
Windows and doors
Use walkthroughs to document:- Openings to replace
- Frame condition
- Trim damage
- Window styles
- Door configurations
- Hardware
- Glass condition
- Access restrictions
- Interior and exterior finish work
- Customer selections
Restoration
Restoration contractors can capture:- Water damage
- Fire damage
- Smoke damage
- Mold-affected areas
- Damaged flooring
- Damaged drywall
- Contents and obstructions
- Demolition requirements
- Reconstruction scope
- Insurance documentation
Property maintenance
Walkthroughs can also support:- Rental turnovers
- Property inspections
- Maintenance lists
- Apartment repairs
- Move-in condition records
- Move-out condition records
- Commercial maintenance
- Punch lists
- Quality-control inspections
- Completion reviews
Cleaning services
Cleaning teams can document:- Rooms included
- Heavy-soil areas
- Post-construction debris
- Appliances
- Windows
- Flooring
- Customer priorities
- Access issues
- Specialty cleaning requirements
- Before-service conditions
Best practices
Before recording, confirm that the correct project is selected. During the walkthrough:- Speak clearly.
- Describe one area or work item at a time.
- State the location of each issue.
- Explain what should be repaired, replaced, removed, or installed.
- Capture a photo when discussing a visual condition.
- Mention important quantities when known.
- State customer requests explicitly.
- Note anything that requires later measurement or inspection.
- Avoid long periods without narration.
- Review the property before selecting Finish.
Location → existing condition → requested work → important detailsFor example:
In the upstairs bedroom, the carpet is stained and damaged near the window. Remove the existing carpet and pad, inspect the subfloor, and install new carpet selected by the customer.
Review AI-generated content
AI-generated walkthrough documents may contain incomplete or incorrect interpretations. Before sharing or using the document:- Confirm the identified work areas.
- Review every written item.
- Check that photos appear under the correct section.
- Correct quantities.
- Verify names and locations.
- Remove unsupported assumptions.
- Add missing scope.
- Confirm exclusions.
- Verify measurements separately.
- Review pricing independently.