
What photos can document
Use project photos to capture:- Existing site conditions
- Damage and areas requiring repair
- Materials, colors, and finishes
- Measurements and dimensions
- Areas included in the proposed scope
- Access limitations
- Customer requests
- Work in progress
- Change-order conditions
- Completed work
- Before-and-after comparisons
Keep photos connected to the project
Photos captured from inside a project are automatically associated with that property and project record. This keeps the photo connected to information such as:- Project name
- Property address
- Team member who captured it
- Date and time captured
- Available GPS information
- Labels
- Comments
- Estimates and documents that use the photo
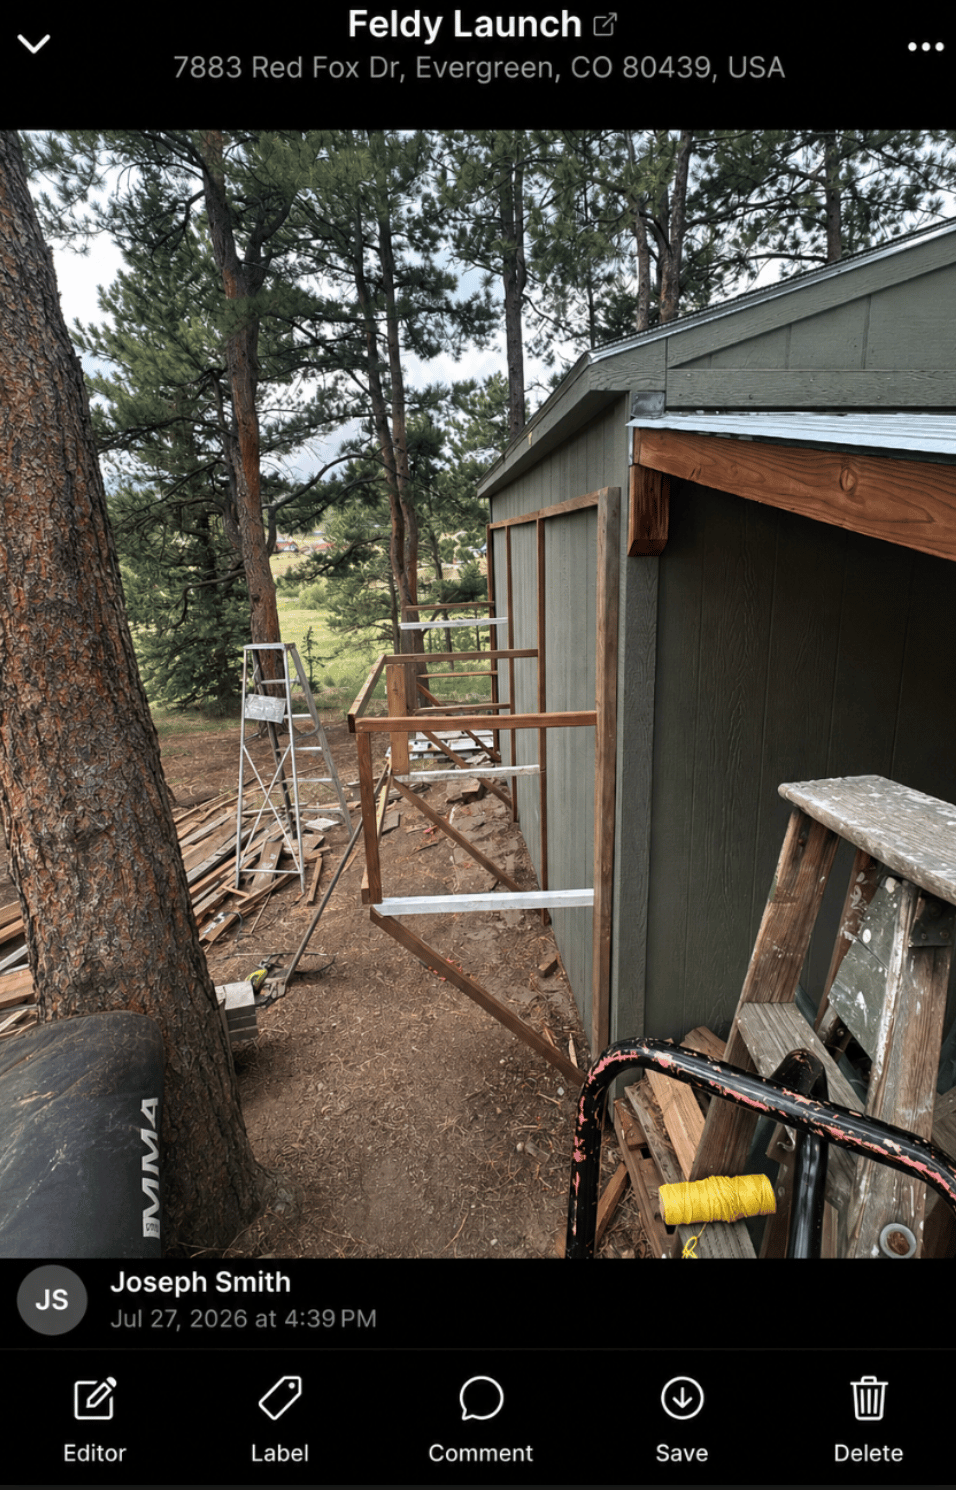
View a project photo
Open a photo to view it in full screen. The photo viewer may display:- The project name
- Property address
- Team member who captured the photo
- Date and time
- Available photo details
- Editing tools
- Labels
- Comments
- Save and delete actions
Edit and annotate photos
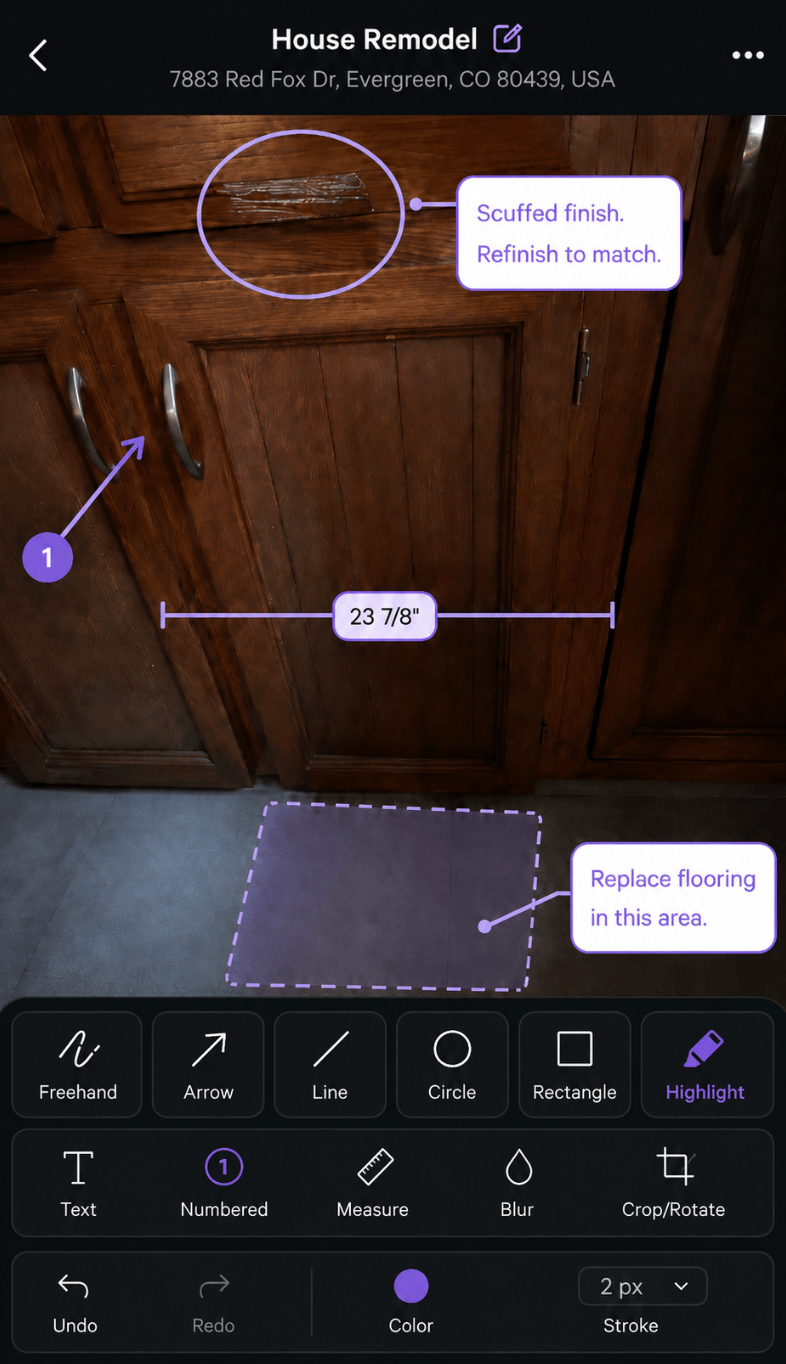
Feldy includes a field-focused image editor for marking up jobsite photos. Use the editor to explain what needs attention, identify areas included in the work, record dimensions, or communicate instructions to another team member. Available editing tools include:Freehand
Draw directly on the image with your finger. Use freehand markup to:- Outline irregular damage
- Trace cracks or affected surfaces
- Mark areas that need attention
- Add quick field notes visually
Arrow
Add an arrow pointing to a specific object or condition. Arrows are useful for identifying:- Damaged materials
- Fixtures to remove
- Areas requiring repair
- Customer-requested changes
- Hidden or easily missed conditions
Line
Draw a straight line across the photo. Use lines to show boundaries, edges, installation paths, or the extent of a work area.Circle
Circle an object or condition that requires attention. For example, you can circle:- A damaged cabinet surface
- A roof penetration
- A cracked window
- A stain or leak
- A siding defect
Rectangle
Draw a rectangular boundary around an area. This is useful for showing:- Flooring sections to replace
- Drywall areas to repair
- Windows or doors included in the scope
- Sections of siding or roofing
- Defined work zones
Highlight
Apply a translucent highlight over part of the image. Use highlights when you want to call attention to an area without completely covering the underlying photo.Text
Add written annotations directly to the image. For example:Scuffed finish. Refinish to match.Or:
Replace flooring in this area.Text annotations help preserve field context and reduce ambiguity when the photo is reviewed later.
Numbered markers
Place numbered markers on the image to identify multiple items. Numbered annotations are useful when several conditions need to be referenced in a comment, estimate, or inspection summary. For example:- Replace damaged handle
- Repair cabinet face
- Refinish lower panel
Measure
Add a visible dimension to the photo. Measurements can help communicate the approximate size of an object, opening, or work area. For example, a cabinet door can be marked with its measured width so the office team can understand the scale without relying only on the image.Blur
Blur sensitive or unnecessary information before sharing the image. Blur can be used to hide:- Personal information
- Faces
- License plates
- Documents
- Customer belongings
- Other sensitive details
Crop and rotate
Crop the image to focus on the relevant work area or rotate it into the correct orientation. Cropping can make annotations easier to understand by removing unrelated parts of the photo.Customize annotations
The photo editor also allows you to adjust the appearance of annotations. Depending on the selected tool, you can change:- Annotation color
- Stroke thickness
- Shape placement
- Text position
- Highlight size
- Purple for proposed work
- Red for damage
- Green for completed work
- Yellow for items requiring confirmation
Undo and redo changes
Use Undo to remove the most recent edit. Use Redo to restore an edit that was removed. Continue reviewing the image until the annotations clearly communicate the intended condition or scope.Save the edited photo
When the markup is complete, save the edited image. The annotated photo remains connected to the project and can be reviewed by other team members. Annotated images can be used to support:- Estimates
- Scopes of work
- Change orders
- Internal instructions
- Customer communication
- Inspection documentation
- Project-completion records
Add labels
Labels help organize photos within a project and across the organization. Common labels may include:- Before work
- Work in progress
- Completed work
- Existing damage
- Customer request
- Needs review
- Roof
- Exterior
- Kitchen
- Flooring
- Change order
- Material selection
Add comments
Users can add comments directly to a photo. Comments remain connected to that specific capture, making it clear which condition or question is being discussed. A field user might write:The customer wants this cabinet section included, but not the cabinet interiors.A front-office user might respond:
Please confirm the number of doors and drawer fronts before we finalize the estimate.Comments allow the field and office teams to collaborate while the visual context remains directly in front of them.
Save a photo to your device
Select Save to download a copy of the photo to your phone or device. This can be useful when the image needs to be:- Shared outside Feldy
- Added to another system
- Sent directly to a customer or subcontractor
- Preserved locally
- Included in external documentation
Delete a photo
Select Delete when a photo was captured accidentally, is unrelated to the project, or should no longer remain in the project gallery. Review the photo carefully before deleting it. Deleting a capture may remove visual information that was being used by another team member or referenced in an estimate, walkthrough, or document.Photos on the web
The Feldy web application gives front-office users a centralized view of photos captured across the organization. Office users can:- See newly uploaded field photos
- Browse photos by project
- Review all organization captures
- Open individual photos
- See who captured each photo
- Review the property address and available GPS data
- Add labels
- Add comments
- Return to the associated project
Photos by project
The Photos by project view groups captures according to the project they belong to. Each project card may show:- A recent photo
- Project name
- Property address
- Team members associated with the captures
- The number of stored photos
All photos
The All Photos view displays individual photos across the organization. Use this view to review recent capture activity without opening each project separately. This is useful for managers and office users who want to quickly see:- Which properties were recently visited
- What work is being documented
- Who is active in the field
- Whether additional photos are required
- Which jobs are ready for estimating or review
Use photos with Feldy AI
Photos are more than stored project records. They are an input to Feldy’s AI and vision workflows. Selected photos can be used to help generate:- AI estimates
- Scopes of work
- Project summaries
- Inspection documentation
- Change-order descriptions
- Customer proposals
- Roof and exterior measurement reports
- Exterior 3D property models
Capture-quality guidelines
For stronger project documentation and AI results:- Begin with wide photos showing the overall area
- Take additional photos from different angles
- Include close-ups of damage and important details
- Keep the camera steady
- Use adequate lighting
- Avoid cutting off important surfaces
- Capture building corners and transitions
- Include objects that affect access or labor
- Add labels and comments while the context is fresh
- Use annotations when the condition is not obvious
- Review the photos before leaving the property
Timeline
Timelines let teams track how a specific location on a project changes over time. Instead of treating progress photos as unrelated images, Feldy groups them around one clearly defined location, such as a kitchen cabinet wall, roof section, exterior elevation, damaged floor area, or room under renovation. Each timeline begins with a main photo. Additional photos can then be added in chronological order to create a clear visual record of the work.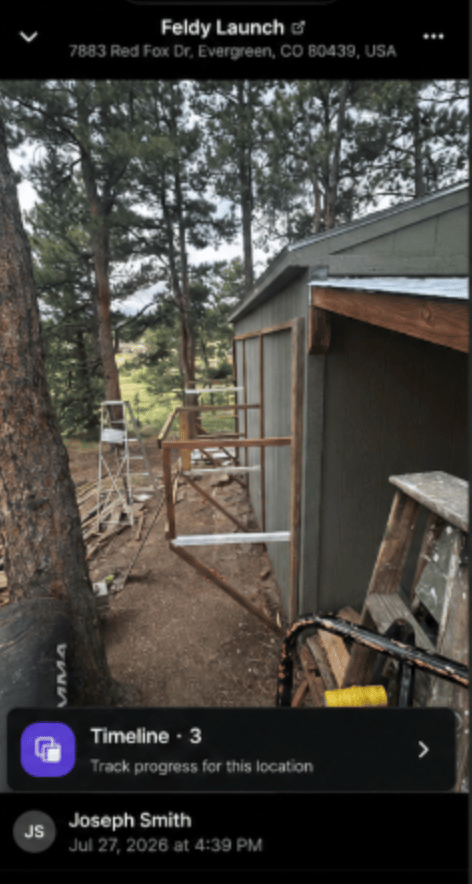
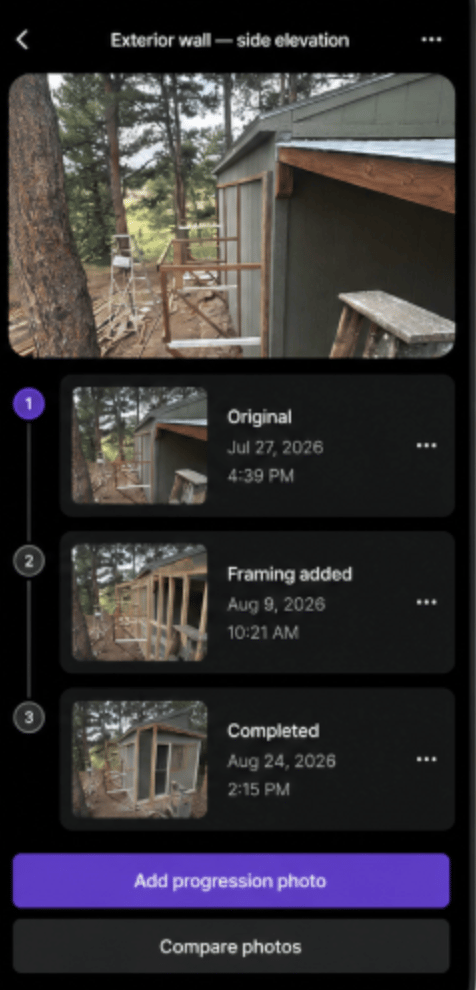
Beta feature: Timelines are currently in beta and must be enabled for your organization before they can be used. Contact your organization administrator or Feldy support to request access.
How timelines work
A timeline is connected to:- A project
- A specific jobsite location
- A main photo
- Any progression photos added later
- Original condition
- Framing installed
- Siding added
- Painting completed
- Final inspection
Start a timeline
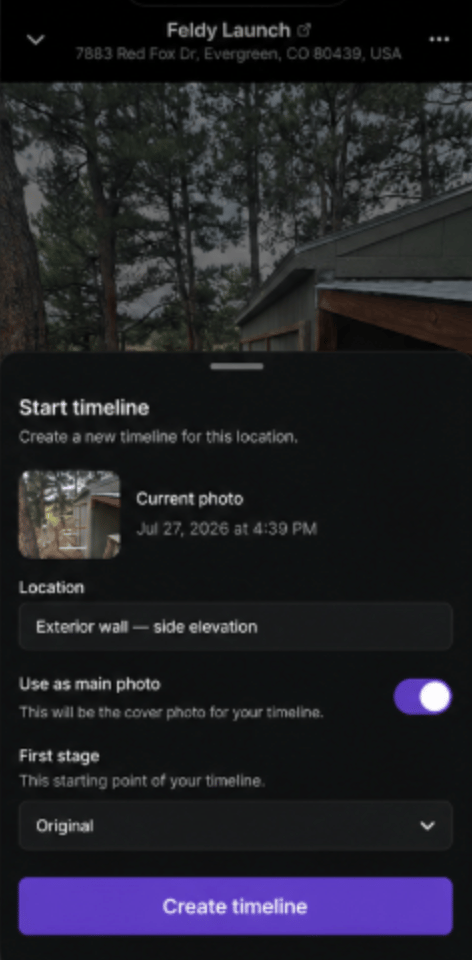
To create a timeline:- Open a photo from the project’s Photos section.
- Select Timeline.
- Choose Start timeline.
- Enter a name for the location.
- Confirm that the current photo should be used as the main photo.
- Select Create timeline.
- Kitchen — cabinet wall
- Exterior — north elevation
- Roof — rear slope
- Bathroom — vanity area
- Living room — damaged flooring
Add a progression photo
Once a timeline has been created, you can continue documenting the location as work progresses. To add another photo:- Open the timeline.
- Select Add progression photo.
- Take a new photo or select an existing photo from the project.
- Add an optional note describing the update.
- Select Add to timeline.
- Framing completed
- Cabinets removed
- First coat of paint applied
- Damage discovered behind wall
- Installation completed
- Customer revision completed
Open a timeline from Photos
Photos that belong to a timeline are identified in the project’s photo grid. The main photo displays the timeline and the number of connected photos. Other photos in the same group are marked as belonging to that timeline. You can open the timeline from either:- The timeline indicator on the main photo
- The Timeline action in the full photo view
View timeline progress
The timeline view displays:- The main location photo
- The location name
- Each connected photo in chronological order
- Capture dates and times
- The team member who added each photo
- Notes associated with individual updates
Compare timeline photos
You can compare any two photos from the same timeline. Select Compare photos, choose two images, and open the comparison view. Feldy displays the images side by side with a draggable slider, making it easier to review changes between the original condition and later progress. This is useful for:- Before-and-after documentation
- Customer updates
- Quality control
- Inspection records
- Change verification
- Completion evidence
Use timelines in reports and documents
Timeline photos can be added directly to Feldy-generated documents to show how a location changed over time. Teams can include selected timeline entries in:- Field reports
- Daily or weekly progress reports
- Milestone updates
- Customer updates
- Inspection reports
- Completion reports
- Change-order documentation
- Insurance or restoration documentation
- Internal quality-control records
- Original condition
- Framing completed
- Installation in progress
- Completed work
- A chronological photo sequence
- A before-and-after comparison
- A side-by-side progress view
- Individual milestone cards with captions
Change the main photo
The main photo represents the timeline in project previews and the Photos grid. You can change the main photo from the timeline menu when a later image provides a clearer view of the location. Changing the main photo does not remove or reorder any timeline entries.Timeline photos remain regular project photos
Adding a photo to a timeline does not create a duplicate or remove it from the project’s Photos section. The photo remains available for:- Comments
- Labels
- Editing and annotation
- AI generation
- Estimates and documentation
- Saving and sharing
Best practices
Use one timeline for each clearly defined location. Avoid grouping photos that show different rooms, elevations, or work areas. Use consistent location names and capture new photos from a similar viewpoint whenever possible. Add short notes when the visual change may not be immediately obvious. A well-maintained timeline gives the office, field team, customer, and inspector a shared visual record of how the work progressed.AI Photo Generation
AI Photo Generation lets teams create visual concepts from an existing project photo/photos. Start with a real jobsite photo, describe the change you want to see, and Feldy generates new images while keeping each result connected to the original source photo. This can be used to explore design ideas, show customers possible outcomes, compare materials, communicate scope, and create visual references before work begins.AI-generated concepts: Generated images are visualizations, not proof of completed work. Measurements, products, costs, structural feasibility, and site conditions should always be verified before construction decisions are made.
How AI Photo Generation works
Each generation is connected to:- The project
- The original source photo
- The prompt used
- Any reference images provided
- The generated results
- The images the user chooses to save
- Later revisions created from a saved result
Generate images from a photo
To generate new images:- Open a photo from the project’s Photos section.
- Select Ask Feldy.
- Describe what you want Feldy to generate.
- Choose how many outputs to create.
- Optionally select a saved template.
- Optionally add one or more reference images.
- Select Generate.
Write a prompt
The prompt should describe the change you want to visualize. Examples include:- Generate five cabinet variations while keeping the same layout and camera angle.
- Replace the existing cabinets with modern shaker cabinets.
- Show this exterior with several siding and trim combinations.
- Generate three window styles for this opening.
- Replace the flooring with hardwood, carpet, and luxury vinyl plank.
- Show several roofing material options.
- Visualize the area after cleanup.
- Remove the damaged tree.
- Show this room with a lighter, more modern finish.
- Generate good, better, and best design options.
Generate five cabinet variations for this area. Keep the same cabinet placement, room layout, countertop, and camera angle. Explore different materials and finishes.
Choose the number of outputs
Use the output control to choose how many images Feldy should generate. Generating several outputs is useful when comparing:- Styles
- Colors
- Materials
- Product configurations
- Design directions
- Good, better, and best options
- Customer preferences
- Alternate scopes
Use saved templates
Saved templates provide reusable prompts for common workflows. Examples may include:- Cabinet variations
- Exterior color options
- Window style options
- Door alternatives
- Flooring options
- Roofing material options
- Siding and trim combinations
- Paint color concepts
- Cleanup visualization
- Landscape concepts
- Good, better, and best packages
Add reference images
Reference images help Feldy understand the appearance, material, product, or design direction you have in mind. You can add multiple reference images before generating. Reference images might show:- A cabinet style
- A siding profile
- A paint color
- A window configuration
- A roof material
- A flooring finish
- Hardware or trim details
- A landscaping style
- A finished room
- A broader design aesthetic
Best use cases
AI Photo Generation is most useful when the customer, field team, estimator, or project manager needs to visualize a possible outcome before the work is completed.Interior remodeling
Use AI generation to explore proposed changes inside a property. Common use cases include:- Kitchen cabinet styles
- Cabinet colors and finishes
- Countertop materials
- Backsplash concepts
- Hardware finishes
- Appliance color changes
- Kitchen island designs
- Bathroom vanity styles
- Shower tile concepts
- Bathtub and fixture options
- Wall colors
- Accent walls
- Wallpaper concepts
- Flooring alternatives
- Lighting fixture changes
- Built-in shelving
- Fireplace surrounds
- Closet layouts
- Trim and molding options
- Interior door styles
- Stair railing concepts
- Furniture placement
- Room restyling
- Basement finishing ideas
- Garage conversion concepts
Generate five versions of this kitchen using different cabinet materials. Keep the layout, windows, appliances, and camera angle unchanged.
Exterior remodeling
Use AI generation to help customers understand proposed exterior improvements. Common use cases include:- Siding colors
- Siding materials
- Trim combinations
- Exterior paint schemes
- Roofing materials
- Roof colors
- Window styles
- Window-frame colors
- Entry-door options
- Garage-door styles
- Shutters
- Columns
- Porch finishes
- Railing options
- Soffit and fascia colors
- Gutter colors
- Stone or brick accents
- Exterior lighting
- House-number placement
- Deck finishes
- Fence styles
- Exterior modernization
- Full façade concepts
Show five exterior combinations using light siding, dark trim, black windows, and different front-door colors. Keep the structure and landscaping unchanged.
Roofing
AI concepts can help customers compare the visual appearance of roofing options. Common use cases include:- Shingle colors
- Architectural versus traditional shingles
- Metal roofing concepts
- Standing-seam colors
- Tile roofing appearances
- Roof-and-siding combinations
- Roof-and-gutter combinations
- Before-and-after replacement concepts
- Roof visualization for proposals
Siding and exterior cladding
Use AI generation to compare materials and design directions. Common use cases include:- Vinyl siding
- Fiber-cement siding
- Engineered wood siding
- Wood siding
- Board-and-batten
- Lap siding
- Shake accents
- Stone veneer
- Brick treatments
- Mixed-material façades
- Vertical and horizontal combinations
- Siding and trim color packages
Windows and doors
AI generation can help customers compare products before ordering. Common use cases include:- Picture windows
- Casement windows
- Double-hung windows
- Sliding windows
- Bay or bow windows
- Arched windows
- Black versus white frames
- Window-grid patterns
- Larger replacement openings
- Patio doors
- French doors
- Entry doors
- Door colors
- Glass and panel styles
- Garage doors
- Shutters and surrounding trim
Painting
Painting contractors can generate visual options before a customer chooses a final color. Common use cases include:- Interior wall colors
- Exterior color schemes
- Accent walls
- Cabinet repainting
- Trim colors
- Door colors
- Ceiling colors
- Multi-room palettes
- Commercial color concepts
- Before-and-after painting previews
Flooring
Use AI generation to compare flooring materials in the actual room. Common use cases include:- Hardwood
- Engineered wood
- Luxury vinyl plank
- Laminate
- Carpet
- Tile
- Polished concrete
- Epoxy flooring
- Floor colors
- Plank direction
- Flooring transitions
- Good, better, and best material options
Landscaping and lawn care
AI concepts can help homeowners visualize outdoor improvements. Common use cases include:- Planting layouts
- Garden beds
- Mulch and rock options
- Sod replacement
- Artificial turf
- Tree placement
- Tree removal visualization
- Shrub placement
- Pathways
- Retaining walls
- Outdoor lighting
- Fencing
- Patios
- Fire-pit areas
- Outdoor seating areas
- Low-maintenance landscaping
- Drought-tolerant landscaping
- Seasonal concepts
- Cleanup visualization
Decks, patios, and outdoor living
Use AI generation to visualize outdoor additions and finish options. Common use cases include:- Deck-board colors
- Composite decking
- Wood decking
- Railing styles
- Stair placement
- Pergolas
- Covered patios
- Paver patterns
- Concrete finishes
- Outdoor kitchens
- Fire pits
- Seating layouts
- Privacy screens
- Porch renovations
Cleaning services
Cleaning teams can use AI generation to communicate expected outcomes. Common use cases include:- Visualizing a cleaned room
- Decluttering concepts
- Post-construction cleanup previews
- Move-out cleaning expectations
- Exterior wash visualization
- Window-cleaning outcomes
- Floor-restoration concepts
- Before-and-after customer presentations
Restoration work
Restoration contractors can use AI concepts to communicate possible finished conditions. Common use cases include:- Water-damage restoration concepts
- Fire-damage restoration concepts
- Storm-damage repair visualization
- Reconstructed walls or ceilings
- Flooring replacement
- Cabinet replacement
- Exterior repair concepts
- Room restoration options
- Pre-loss appearance visualization
- Customer selection discussions
Handyman and general repair work
Handymen can use AI generation to show customers how smaller projects may look. Common use cases include:- Replacing a door
- Adding shelving
- Installing trim
- Repairing drywall
- Repainting a room
- Replacing flooring
- Adding storage
- Updating fixtures
- Replacing railings
- Improving a porch
- Creating a small built-in
- Visualizing grouped repair work
Commercial property improvements
AI concepts can also support commercial sales and planning. Common use cases include:- Retail storefront updates
- Office refreshes
- Apartment-unit turns
- Common-area improvements
- Exterior paint concepts
- Signage placement
- Flooring changes
- Lighting updates
- Reception-area concepts
- Restaurant finishes
- Tenant-improvement options
- Property-management approval packages
Sales and customer presentations
Generated images can help customers evaluate options and make decisions. Common use cases include:- Initial sales conversations
- Good, better, and best proposals
- Product-selection meetings
- Material-selection approvals
- Upsell opportunities
- Change-order discussions
- Customer revision requests
- Proposal visuals
- Design-review meetings
- Remote customer updates
Estimating and scope development
A saved generated concept can provide additional visual context when preparing work documents. Common use cases include:- Identifying likely work categories
- Describing the intended result
- Creating preliminary scope language
- Organizing estimate line items
- Building material allowances
- Communicating exclusions
- Comparing alternate scopes
- Supporting good, better, and best estimates
Internal planning and field communication
AI concepts can help align office and field teams. Common use cases include:- Showing the intended finish
- Communicating customer preferences
- Explaining a requested revision
- Clarifying which area should change
- Supporting installer instructions
- Reviewing options before ordering
- Discussing project feasibility
- Preparing for a site visit
- Coordinating subcontractors
Review generated results
After generation, Feldy displays the outputs together with:- The original source photo
- The prompt used
- Any reference images
- The number of images generated
- Each generated option
- Controls for selecting results
- Options to compare, save, or revise
Save selected results
Feldy does not automatically save every generated image. To keep a result:- Select one or more generated images.
- Choose Save selected.
- Confirm where the images should be saved in the project.
- The original source photo
- The prompt
- The reference images
- The generation set
- Any later revisions
Compare generated results
You can select two generated images and compare them directly. The comparison view displays both images side by side with a draggable divider, making it easier to review differences in:- Color
- Material
- Style
- Product selection
- Finish
- Layout details
- Overall appearance
Revise a generated result
To refine an option:- Open the generated result.
- Select Revise prompt.
- Describe the change you want.
- Choose how many revisions to generate.
- Select Generate.
- Keep this design but use brass hardware.
- Make the cabinet finish lighter.
- Keep the siding color and change only the trim.
- Use this window style but make the frames black.
- Keep everything else the same and replace the roof material.
- Keep this landscaping layout but use lower-maintenance plants.
AI generation and the original photo
The original photo is always preserved. Feldy keeps a record of:- Which photo was used as the source
- The prompt used
- The reference images
- The generated alternatives
- The saved selections
- Any revisions
Use generated images in project workflows
Saved AI images can be used in:- Customer presentations
- Proposals
- Estimates
- Scope-of-work documents
- Material-selection discussions
- Design approvals
- Change orders
- Milestone planning
- Internal project reviews
- Installer instructions
- Field reports
- Cabinet removal
- New cabinet installation
- Hardware
- Countertop adjustments
- Painting and touch-up
- Labor
- Material allowances
- Disposal
AI-generated images are concepts
AI-generated images should not be treated as proof that work has been completed or as a guaranteed representation of the finished result. They may not perfectly represent:- Exact dimensions
- Product availability
- Product specifications
- Structural feasibility
- Building-code requirements
- Installation details
- Material texture or color
- Hidden site conditions
- Final project cost
- Manufacturer warranties
- Permit requirements
Best practices
Use a clear source photo with the target area visible. Describe both what should change and what should remain unchanged. Add reference images when a specific material, product, or design direction matters. Generate several options for customer-facing decisions, but save only the results that are useful to the project. Keep prompts focused. A single request such as changing cabinets, windows, siding, or flooring will usually produce more consistent results than asking for many unrelated changes at once. For better comparisons, ask Feldy to preserve:- The camera angle
- The room or building layout
- Openings and structural elements
- Existing objects that should remain
- Lighting conditions
- Surrounding materials